
Beginner Sourdough Bread Recipe
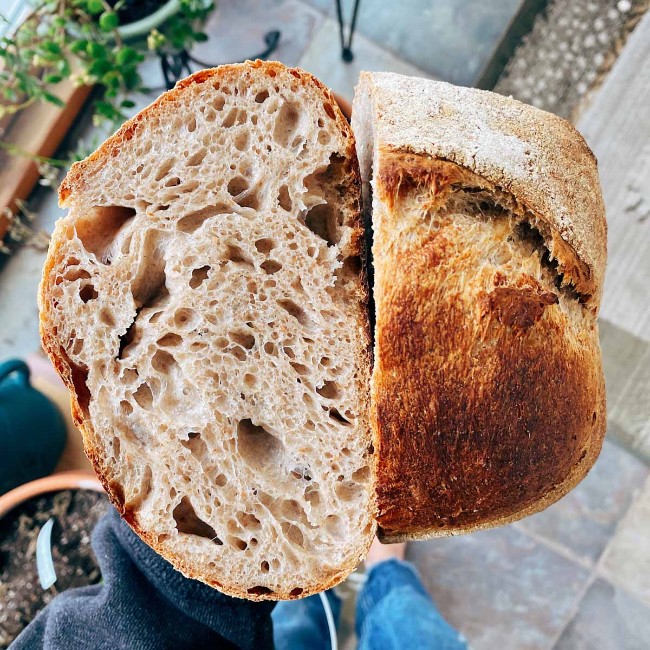
This recipe will show you how to make delicious, nourishing, whole grain sourdough bread with a beautiful open crumb, superb flavor, and chewy texture. It's perfect for beginners, but I've been using these exact steps to make sourdough bread on a regular basis for the last three years. It produces a rustic loaf that won't be as springy or voluminous as a 100% white flour bread, but that's a good thing. We're making a nutrient-rich, intensely flavorful sourdough bread using high-quality whole grain flours and very long and slow fermentation. It's hearty and satisfying, but not overly dense. Instead, you'll get a light and airy loaf that delivers a sweet, nutty taste from the whole grain red wheat and spelt.

Health Benefits of Sourdough Bread
This bread is made with nutrient-rich, stone-ground whole grain flour and prepared using a long and slow 24-hour natural fermentation to develop flavor and texture. This lengthy fermentation also conveys remarkable health benefits because it allows time for the lactic acid bacteria (LAB) in your sourdough stater to do what they do best – eliminate antinutrients, unlock vitamins and minerals, and degrade complex starches and proteins. Natural fermentation is a process that activates grains and transforms them into a more nutritious, delicious, and digestible state. It's what makes sourdough bread an OG superfood.
1) Unlocks Vitamins and Minerals
Fermentation unlocks vitamins and minerals in grains, like B-vitamins, iron, zinc, magnesium, selenium, and manganese.
2) Improved Nutrient Absorption
Because of #1 above, these valuable nutrients are more bioavailable and easier for your body to absorb.
3) Gut Healthy
A long, natural fermentation with sourdough starter breaks down antinutrients, enzyme inhibitors, and lectins, and it initiates the degradation of complex starches and proteins. This process neutralizes plant compounds that can inhibit digestion and negatively impact your health while making it easier to digest the carbs and proteins in grains.
4) Prebiotic Fiber
Whole grains are packed with prebiotic fiber, and sourdough fermentation makes even more! Prebiotics stimulate the growth of beneficial bacteria by providing food for the microbes in your gut.
5) Antioxidants
Whole grains are an excellent source of antioxidants, and a natural fermentation process increases the antioxidant capacity of polyphenols and other beneficial phytonutrients. Lactic acid bacteria produce lactic acid, which acts as a powerful antioxidant too.
6) Slow-Digesting
Whole grain sourdough bread is packed with dietary fiber, prebiotic fiber, resistant starch, and complex carbs. Fiber rich, slow digesting carbs provide more sustained energy and keep you feeling full longer.

What Flours Are Best For Sourdough?
For this recipe, I used half white flour and whole grain spelt flour from Farmer Ground Flour, a mill in upstate New York that produces organic, freshly milled stone-ground flour from NY grown grains. Their half-white flour is 85% extraction, meaning 15% of the bran and germ are sifted out. It's still whole-grainy and packed with nutrients. Plus half white flour has a strong flavor that pairs beautifully with the nuttiness of whole-grain spelt flour.
I encourage you to seek out local flour options in your area if possible. Working with local flour can be more challenging and unpredictable than typical store-bought flour, but we're not after consistency here. Our goal is to create nourishing and delicious bread – deeply flavor and nutrient-rich. Consistency and uniformity have their perks, but they usually come at the expense of health and tastiness.
If you don't have half white flour, here are some flour alternatives that are pretty widely available. Any whole grain spelt flour will do.
- 50% King Arthur White Bread Flour + 50% King Arthur Whole Wheat Flour
- 50% King Arthur White Bread Flour + 40% King Arthur Whole Wheat Flour + 10% Whole Grain Spelt Flour
What supplies do you need for sourdough bread baking?
These are your bread-making essentials:
- Kitchen Scale - I recommend this digital scale or this non-digital scale
- Proofing Basket - I recommend this brand. If you don't have a proofing basket, I recommend using a Tupperware that is similar in size to the proofing basked and line it with a folded cloth so it cradle the bread. If you go this route, be sure to cover you bread with a cloth to keep it from drying out.
- Cast Iron Dutch Oven - I recommend investing in this lodge cast iron. Using a covered cast iron will your bread the rise, crust, and tender crumb you're looking for.
- Scoring Tool - I actually like to buy mine from Etsy sellers like this one but this one is also great.
- Dough Scraper

Example Sourdough Bread Making Schedule
Tailor this schedule to fit your needs! You can make the autolyse as short as 30 minutes or as long as 4 hours, whatever works best for you. Or, if you're in a rush, you can skip that step entirely. You really just need to time it so that you're home for the mix and bulk fermentation, which takes about 4-5 hours.
Night Before
- 9pm: Feed your starter
Day One:
- 8am: Autolyse
- 9am: Mix
- 9am - 1pm: Bulk Fermentation
- 1:10pm: Pre-shape
- 1:30pm: Shape
- 1:35pm - 8am: Proof
Day Two
- 8am: Score and Bake!
Ingredients for Sourdough Bread
- Sourdough Starter: 100g
- Water: 400g
- Half White Bread Flour: 450g
- Whole Grain Spelt Flour: 50g
- Salt: 9g

How to make Beginner Sourdough Bread Recipe
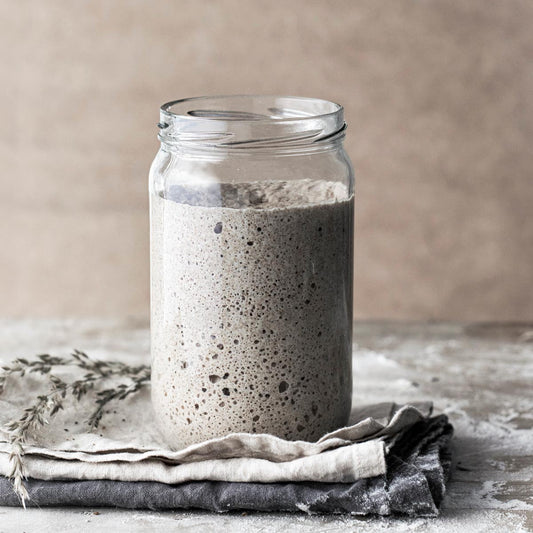
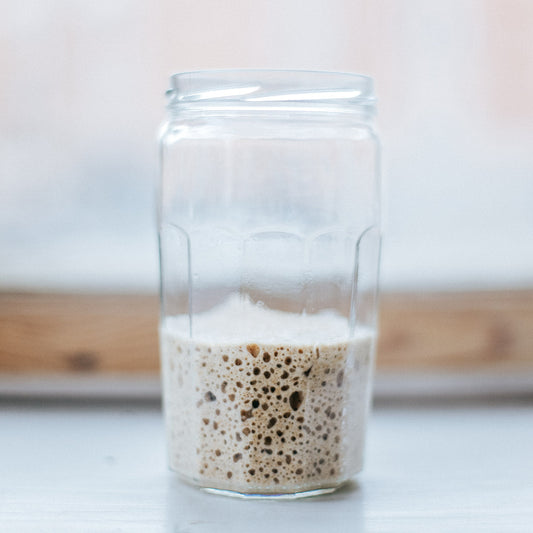
Step 1: Feed Your Starter, 9pm
You'll want to feed your starter about 8-12 hours before you plan to mix all of the ingredients together. Since this recipe calls for 100g of active, bubbly starter, it makes sense to feed at least 70 grams of water and 70g of flour the night before if you're planning to mix the following morning. You'll remove 100g the next day for this recipe, and you should have just enough on hand to refeed to maintain your starter.
Step 2: Autolyse, 8am
In a large bowl or Tupperware, combine 450g of Half White Flour, 50g of Whole Grain Spelt Flour, and 375g of water. Using your hands, mix the ingredients together until the dough fully absorbs the water. This will only take a couple of minutes, and there should be no dry patches left when you're done. When you're finished mixing, cover with a towel, plastic wrap, or use a lid if it's in a plastic or glass Tupperware. Let the dough rest for at least 30 minutes and up to 4 hours.
What is Autolyse in Baking?
Feel free to skip this part, but I think it's pretty cool! Bread baking is a series of miraculous transformations, and the autolyse is the first major step. The term "autolyse" comes from the scientific word autolysis, which is the breakdown of plant tissue by enzymes in the affected tissue – AKA, self-digestion.
Benefits of Autolyse
All you did was mix flour and water together – you haven't even added in the salt or starter yet – but by simply hydrating the flour, you've initiated an almost magical biological process. In the presence of water, the bran from our whole wheat flour softens, and gluten bonds begin to form. As for the whole "self-digestion" thing, the water also activated 2 types of enzymes present in the flour: amylase and protease. Once activated, amylase breaks down complex starch chains into simple sugars called maltose. And you know who loves maltose? The very, very hungry yeasts in your sourdough starter. While amylase turns the flour into perfect yeast food, protease is hard at work, degrading gluten proteins. Protease softens the dough by chopping gluten proteins into pieces, making it easier to work with down the line.
Step 3: Mix, 9am
After you've let the dough rest on its own for anywhere from 30 minutes to 4 hours, add 100g of active bubbly sourdough starter and mix it in with your hands. Once the starter is thoroughly incorporated, perform stretch and folds for 3-5 minutes. You want to stop when the dough feels smooth and it becomes difficult to stretch out. This process helps further develop the gluten structure and improves elasticity.
Here's a great video showing how to perform strong stretch and folds.
After you're done, add in all of the salt and the remaining 25g of water. Pinch in the salt until it's fully dissolved into the dough. Perform 4 more stretch and folds to ensure the salt is thoroughly distributed.
Step 4: Bulk Fermentation, 9:10am
Bulk fermentation is simply the process of letting your dough ferment at room temperature. It usually takes about 3-5 hours, but it can vary depending on the temperature of your home and the strength of your starter.
For this step, you're going to perform 4-5 sets of stretch and folds every 30-45 minutes. In the beginning, we really want to work the dough and build structure, so focus on strong stretch and folds, as shown in the video above. As the hours go by and the dough becomes stronger and more voluminous, begin to perform more gentle stretch and folds.
Here's a great video showing how to do soft stretch and folds. You'll notice that the dough is bubbly and airy at this point.
When is bulk fermentation done?

The bulk fermentation is done when the dough has significantly increased in size, air bubbles form on top, and air pockets on the sides and bottom. You can also perform the poke test. If you poke the dough gently with your index finger and it bounces back, retaining its original shape in the affected spot, it's a sign your dough is ready.

I took this photo right after bulk fermentation was complete! When you dump out your dough after bulk fermentation, you should see "spiderwebs" or air bubbles underneath like this.
Step 5: Pre-shape, 1:10pm
Not gonna lie, I skip this step all the time. But, if you want to go all out, pre-shaping is an excellent way to continue to build the structure of your dough – there's a reason why dedicated bakers always include it as part of the bread-making process. But we're not perfectionists, and sometimes you gotta skip it. Other times you just forget entirely. That's fine too.
On to the pre-shape! Carefully dump out your dough onto a work surface (not floured, we want it to be a little sticky) by flipping your bowl or Tupperware upside down and letting it all plop out. The main goal with the pre-shape is to gently form the dough into a tight ball by turning it and tucking under, turning, and tucking under. The whole time using the friction of the table to create tension in the dough.
Here is an excellent pre-shaping video from The Perfect Loaf.
After you're done preshaping, let the dough rest for 20 to 30 minutes.
Step 6: Shape, 1:30pm
How to Shape Sourdough Bread
First, you'll want to prepare your proofing basket. You can use a regular kitchen bowl, a round bread basket, a long breadbasket, Tupperware, etc. The options are endless. Sometimes I even use just a 9’’x5" loaf pan. The main idea here is to pick something that will fit the entire dough inside but is small enough to retain its shape. Line your proofing vessel of choice with a kitchen towel or liner if you have one, and lightly dust with flour.
Lightly flour your work surface, and sprinkle a little bit of flour on top of the dough as well. Flip the dough over, laying the flour side down on the counter. Grab the right two corners of the dough and fold them up and over the middle to form a one-third fold. Grab the left two corners and fold them up and over the middle, layered on top of the fold you just created with the right side. Your dough should look like a long rectangular-ish shape. Starting from the top, grab the dough and fold it over itself about a quarter of the way down. Repeat this fold until you reach the bottom – it's sort of like rolling up a sleeping bag. Here's an excellent video that breaks it down far better than my words ever could. When you're done, pick up the dough and place it in the proofing basket, upside down, with the newly created seam facing up.
Here's a great shaping video for reference.
Step 7: Proof, 1:35pm
Now it's time to lay your dough baby to rest and pop her in the fridge. First, you'll need to cover it to prevent the exterior of the dough from drying out. It's pretty standard for bakers to use a plastic ziplock bag or a dampened cloth. After you've covered the dough, place it in the fridge and let it hang out there for anywhere from 12 to 24 hours.
The proof is really where the magic happens. At this point, the dough has risen sufficiently, so we're ready to slow that process down. The cold temperature of the fridge will drastically reduce yeast activity, and your dough will likely rise a tiny bit overnight. But the lactic acid bacteria (LAB) will work all through the night, converting simple sugars into lactic acid and breaking down gluten proteins. This microbial activity develops flavor, improves texture, and enhances the nutritional value and digestibility of bread.
- The acids created by the LAB activate phytase, an enzyme that neutralizes phytic acid and increases the bioavailability of vitamins and minerals in the dough.
- Lactic acid bacteria degrade complex starches and proteins (like gluten) by chopping them up into simpler forms of sugars and amino acid chains that your body can easily digest.
- During fermentation, lactic acid bacteria synthesize new B-vitamins, increase the amino acid content, including lysine and BCAAs, and boost the antioxidant effect of bread.
Step 8: Score and Bake!
Place your Dutch oven into your oven and preheat to 500 degrees. When the oven is preheated, remove your dough from the fridge. Cover your Tupperware/bread basket with a piece of parchment paper, and then place a cutting board over the parchment paper. While holding the parchment paper and cutting board against the Tupperware, flip it over and allow the dough to turn out.
How To Score Bread Dough
Full disclosure: this one takes practice. Using a scoring knife, gently score your bread at a 45-degree angle, cutting just below the skin that has formed on the outer layer of the dough. This step will allow gases to escape while the bread bakes and prevent it from cracking in unpredictable ways. By scoring, we have greater control of the final product.
Here's a helpful video from Breadtopia on how to score a boule (tip: you don't need to do a full cross-section like they do in the video. I just do one straight line and call it a day)/
Quickly remove your Dutch oven from the oven while being mindful of letting as little heat escape as possible. Lifting from the parchment paper edges, place your dough in the Dutch oven, add the lid, and bake at 500 for 20 minutes. After 20 minutes, remove the lid, and lower the temp to 450. Continue baking for another 20 - 30 minutes. The bread is done when the crust is a beautiful golden brown and the internal temp is about 208-210 degrees.
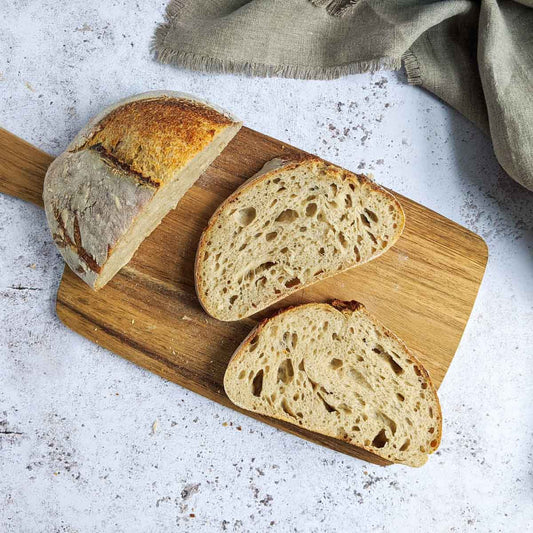
Allow the bread to fully cool (at least one hour) before slicing into it. Or, don't wait and cut into after 15 minutes. Slather with butter and serve with fried eggs. Yes, cutting into it too soon will yield a slightly gummier loaf, but it's a small price to pay for the euphoric experience of freshly baked bread straight out of the oven. Totally your call! Let's put it this way, if you're going to slice it in half and take a photo of the crumb, then definitely wait for it to cool. If you're after delicious, intoxicating, instant gratification that isn't actually so instant because you've been waiting for like 24-36 hours already, then cut into that loaf whenever you feel like it. This is your loaf of bread. You've earned it.
2 comments
Sibyl M
Would it be possible to make this bread with less or no salt?
Would it be possible to make this bread with less or no salt?
Sandy H
I made this recipe with exactly the same flours as in the recipe. It was delicious and made a beautiful loaf! I am relatively new to sourdough baking. So far, no failures, lol. This recipe is going into my favorites!
I made this recipe with exactly the same flours as in the recipe. It was delicious and made a beautiful loaf! I am relatively new to sourdough baking. So far, no failures, lol. This recipe is going into my favorites!